You might have noticed that most of my projects are related to drums. This one isn't different, but it's definitely the most accomplished. It's based on RaspiDrums, but it's much more sophisticated, and advanced. RaspiDrums worked so well that I decided to make it work on my laptop as well, using an arduino to send the sensors' data to the software. So the software now works on PC or Raspberry Pi. The core of RaspiDrums has changed to become a shared library, which makes it a lot more versatile than before. Then, I had the idea of developing a GUI, but I couldn't find any suitable monitor. When the official Raspberry Pi touchscreen was released that I finally started to create the user interface, at that point the project became really different from what it used to be. That's why I decided to rename the project to eXaDrums. I've even draw a logo for the occasion:

Introduction
This project is a fork of RaspiDrums, my first real attempt to use the Raspberry Pi to create a drum module. In addition to massive improvements, the big difference between RapsiDrums and eXaDrums is that eXaDrums comes as a shared library (.so). That means that you can use the library in any of your projects really easily, thanks to the eXaDrums Api. Another big difference is that a graphical user interface (GUI) has been developed using Gtkmm 3. Any linux distribution that can handle Gtk can run the GUI, that includes Raspbian, and Ubuntu MATE on the Raspberry Pi. You can now use eXaDrums on your PC as well, as long as you're running a linux distribution (tested with (X)ubuntu, and Debian), and have a microntroller of some sort to send the sensors' data through the USB. So, in short, eXaDrums consists of two parts: a library that is (will be) providing a complete electronic drum kit, and a GUI that makes things pretty and easy to use.As you may have guessed already, the GUI is meant to be used with a touchscreen. I had this idea months ago, but I couldn't find a good touchscreen that wasn't using the Pi's GPIO. The Raspberry Pi foundation recently release the official Raspberry Pi touchscreen, and it uses the DSI port. So I got one, and started to develop the GUI, and now that I've read and tested Gtkmm quite a lot, I'm confident that the GUI of eXaDrums will be amazing. As the project goes, I intend to build a case for the touchscreen and acquisition board, as well as the full frame of the drum kit, including the drums and cymbals. We're not their yet, but this is clearly where I'm going. Check out the next sections to see some screen shots, demos, etc., and also learn more about the project.
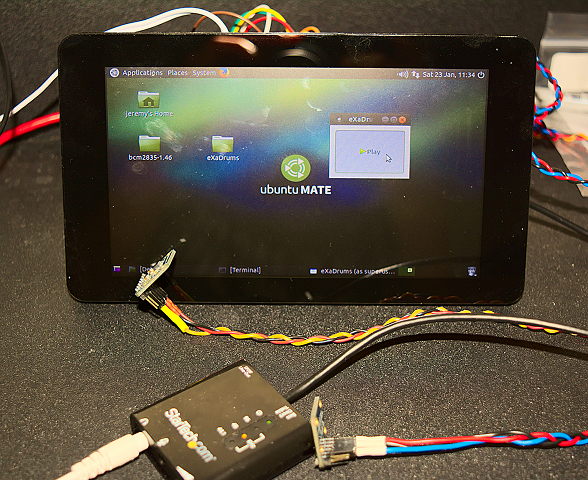
Before we start, here's a picture of the current set-up:
Demos and source code
Let's start with the demos for a change! If you're running a Linux distribution on your PC/Laptop, or Raspberry Pi, you can install eXaDrums. To that end, you need to get both the source code of libeXaDrums, and eXaDrums (the GUI). In case you just want to see some demonstrations, you'll find some things below.Source code (Github)
eXaDrums consists of a shared library (libeXaDrums), that contains the core of the software, and an executable (eXaDrums), that uses the library in order to display the GUI. You can download both libeXaDrums and eXaDrums from Github. The makefiles are included, so these programs are very easy to compile and use. For more information, read the next sections!Demonstrations, screenshots, etc.
Here's a little demo that shows you how eXaDrums performs with two drums:eXaDrums Library
The eXaDrums library, or libeXaDrums, is a shared library (.so). It contains all the functions that are needed to run and control the drum module, kits manager, and more. As it will be explained in this section, if you can compile the library, it's really easy for you to use it in your own C++ program.Dependencies
In order to compile and use libeXaDrums, you need to install some other libraries first. Don't worry, only one of them isn't included in Raspbian/Ubuntu. To install the dependencies that are part of your linux distribution, you need to execute this command line:sudo apt-get install libasound2-dev libtinyxml2-dev
Now you need to install the bcm2835 library. It's relatively easy, you just have to download the library, and type the following into a terminal:
cd bcm2835-1.46
./configure
make
sudo make install
If you want to run the software on your laptop or PC instead of the Raspberry Pi, you need to patch the library first. To do so, you first need to download this patch (which works for version 1.46), and type the following into the terminal (replace path/to/patch by the patch's folder):
cd bcm2835-1.46
cp path/to/patch/bcm2835.patch src/
./configure
cd src
patch Makefile bcm2835.patch
cd ..
make
sudo make install
Get source code, and compile the library
The source code has been written in C++11, and compiled using Eclipse CDT. However, you don't need Eclipse to compile the library. So, first of all, you need to get the code. It's available on Github, where you can download the whole project as a zip file. Unzip the file, and open a terminal in the library's directory. Then, type this to compile the release version:cd Release
make clean
make -j4 all
Alternatively, you can replace the first line by
cd Debug, to compile the debug version.
The -j4 option specifies how many threads should be used to compile the project, if you have a dual core CPU, it's usually 4, if it's a quad core, it probably is 8.
Now in the Release directory (or Debug if you built the debug version), you should see a file named libeXaDrums.so. That's the library that contains all the functions of the eXaDrums software.
Use the library
It's a good thing to be able to compile the library, but it's even better to be able to use it. In order to use the Api, you need to compile the library, but also to get the eXaDrums.h file that contains the definition of the eXaDrums Api. This file is located in the Api folder, and needs to be included in your source code. By doing so, you get the namespace eXaDrumsApi that contains the class eXaDrums. You then just need to use that class. For more details, please refer to the Api Documentation section. There's one more thing that you need to do. At compile time you have to link libeXaDrums to your program. Example:g++ -o "YourProgram" ./Source/file1.o ./Source/file2.o ./Source/file3.o -leXaDrums
The '-leXaDrums' is where your link the library. That means that your linux distribution know where to find the library. So you have to add it to the path, or to copy 'libeXaDrums.so' to a known location. I usually do the following:
sudo cp libeXaDrums.so /usr/lib/
Api Documentation
If you were able to compile the library, you can use it in your C++ programs. However, there are a few things that you need to know to use the library. These things are described below.How to use the class
So, like I said before, the class in defined in the eXaDrumsApi namespace. It is actually pretty easy to use, but I recommend you declare the class as a private member of one of your classes, and you wrap it in a smart pointer. In the GUI, eXaDrums is a private member of the Gui class, and it is defined like that:std::unique_ptr drumKit;
To instanciate the class, you need to specify the 'Data' folder's location, and the type of sensor that you want to use. So far there are 3 types of sensors:
- Hdd: Recorded sensors values are read from a file (useful if you just want to test the software on your PC).
- Spi: That uses the bcm2835 library to read the values from the Spi port of the Raspberry Pi
- Serial: Reads values from the serial input (for instance USB), so that you can use a microcontroller to send the sensors data to your computer (example: arduino, PIC32...).
std::string moduleLocation("./Data/");
drumKit = std::unique_ptr(new eXaDrums(moduleLocation.c_str(), IO::SensorType::Spi));
Kits manager
Before you can start the drum kit, you need to tell the Api which kit you want to use. To that end, you need to create a kit manager. The kit manager needs to know where the drum kits xml configuration files are located:std::string kitsPath("Kits");
drumKit->CreateKitManager(kitsPath.c_str());
Then, you can load a drum kit:
std::string kitLocation("Kits/default.xml");
drumKit->LoadKit(kitLocation.c_str());
Start and stop drum module
Once you've loaded the drum kit, it's pretty easy, you just need to use the start and stop functions of the Api:drumKit->Start(); starts the drum kit, and drumKit->Stop(); stops it.
Graphical User Interface
Because eXaDrums is a shared library, it's a lot easier to reuse in any other C++11 program. The Gui is also developed in C++11 and uses Gtkmm 3. That makes it compatible with a lot of linux distributions.Dependencies
In addition to the eXaDrums library dependencies, you also need to install gtkmm developer's package:sudo apt-get install libgtkmm-3.0-dev
And that's all you need. You can now compile the software.
Compile and use with the library
In order to compile the eXaDrums Gui, you need to have eXaDrums library compiled and installed. Once again, you can get the source code on Github. The program needs eXaDrums library, which you can download from Github as well. If you put both projects folders in the same directory, compiling eXaDrums is fairly easy. For instance, here's the script that I use to compile eXaDrums in release mode:git clone https://github.com/SpintroniK/libeXaDrums.git
git clone https://github.com/SpintroniK/eXaDrums.git
cd libeXaDrums/Release/
make clean
make -j4 all
sudo cp libeXaDrums.so /usr/lib/
cd ../..
cd eXaDrums/Release/
make clean
make -j4 all
The executable file is then located in
eXaDrums/Release.
GUI specifications
So far, the Gui is just a window with a button that starts and stops the drums. This section will be completed as the Gui evolves.